Showing posts with label Facebook. Show all posts

Friday, December 12, 2014

Quickly And Easily Install Facebook Comment System On Blogspot

Facebook Comment System
In order for our blog to get more exposure from Facebook then we are provided with number of facilities by Facebook, one of them is Facebook comment system that we can install on our blog. And today, I will share the easiest and quirkiest way to install Facebook comment on your blog. As the result your blog's post will be commented by Facebook users, and your commented post will appear on the users profile and be seen by all their Facebook friends.

It is because each time a Facebook user comment on a post blog, then the post will be automatically shared on their profile. And of course, by that his or her friends can see the post he/she previously commented. If the posts raise the interests of others, they will be motivated to visit the blog post.

That's the exposure I am talking about. And of course, you will get new audience and traffic landing to your posts. And will benefit your campaign to get more traffics.

So the benefits we will get for installing Facebook comments on our blog are;

  • Our posts will get comments from Facebook users.
  • Our posts will potentially be visited by other Facebook users for the comments posted by their Facebook friends who visited the posts.

Since you have understood the benefits of installing Facebook comment system now it's time to go to the instructions.

How to quickly and easily install Facebook comment system on Blogspot

  • Login to Blogger.com.
  • Now find this code; <data:post.body/>.
  • Once you found it, then place the codes below it.
    <b:if cond='data:blog.pageType == &quot;item&quot;'>
    <div id='fb-root'/>
    <script>
    window.fbAsyncInit = function() {
    FB.init({appId: &#39;136575963025211&#39;, status: true, cookie: true,
    xfbml: true});
    };
    (function() {
    var e = document.createElement(&#39;script&#39;); e.async = true;
    e.src = document.location.protocol +
    &#39;//connect.facebook.net/en_US/all.js&#39;;
    e.async = true;
    document.getElementById(&#39;fb-root&#39;).appendChild(e);
    }());
    </script>
    <fb:comments/>
    </b:if>

Save your template, now see the comment system of Facebook appears on each of your Blog's post. Just wait for the Facebook users to comment to your post. Hope you will find this post useful. And see you again in the next posts.

Thursday, October 16, 2014

How Do I Delete My Facebook Account

How do I delete My Facebook Account. Since Facebook decided to release Open Graph API, protests and anti-Facebook sentiments are all over the net. People are campaigning Quit Facebook Day, and inviting people to quit on May,31, 2010 or they name it "The delete-your-Facebook movement", will you participate?

I will, since I have never been a Facebook fan since I registered to that Social Networking sites as for me it’s the greatest time-waster there has ever been.

And apparently people are now planning to quit from Facebook, as it can be seen if you visit Google.Com and try to type "How Do I..." on the search box then the key phrase: How Do I Delete My Facebook Account will be the second suggestion, see this.
How Do I delete My Facebook Account

So in this article I will elaborate the steps on how to delete your Facebook account easily, here is the steps.

  1. Login to your Facebook account
  2. Now visit this link
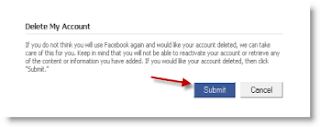
  3. You will find a page which is asking your confirmation whether you are really sure to delete your Facebook account, if you are sure, then click “Submit” see the following image:
Delete My FB Account
Now you have deleted your Facebook account, but actually it’s not really deleted yet, because Facebook will give you 14 days period before your account it’s officially deleted by them, in case you will change your mind of course.

So if you change your mind and want your account back, just log-in to your account before 14 days and you will get your account back. But after 14 days it will be gone!

Please note; deleting your account means you will lose your Facebook badge, Facebook pretty url friendly, Facebook like and other facilities you currently have! Are you ready for the consequences?
That’s how do I delete my Facebook account :D

Automatically Add Drop Cap In WP Without Plugin

If you want to automatically add a drop-cap in your article, you can do it easily, by using a Worpdress plugin which will automatically add the drop cap to your first latter or using CSS code.

I prefer using CSS code rather than plugin, if I can do it manually, why would I need a plugin? Thus I pick the CSS way.

But if you prefer using a WordPress plugin, you can visit Wp repository here and download and install the Drop cap plugin.

Drop Cap Wordpress Without Plugin

And if you prefer using CSS code like I do, then add the following to your style.css file.
.post p:first-of-type:first-letter{
font-size: 48px;
padding: 10px;
float: left;
}

Wednesday, October 15, 2014

Facebook RSS Feed Apps To Import Blog RSS Feed To Facebook Like Page

Importing blog RSS feed to Facebook will give benefit to our blog, especially if you have already have many friends, your new published post will be exposed to your entire friends. They will be notified, if they are interested, there is a big chance they will visit your post. That’s the traffic comes from.
Blog RSS Feed To Facebook


That’s only importing RSS feed blog on your personal Facebook account, how about importing to your Facebook Like (previously Fan) page? Yes it is the same way as importing to personal profile, via Notes -> My Notes -> Edit Import Notes and place the Feed URL there.

Like the following two pictures as the illustrations.

Importing RSS Feed To Facebook Like
And.
Import Blog RSS Feed To Facebook

But it does not work well if the same method is applied on Facebook Like Page. The above works only on our Facebook profile account.

When you apply the same on Facebook Like Page, then you hit Start Importing button, yes your last posts appear on your Facebook Like Page but ONLY THAT DAY, in the next days when you publish new posts. Facebook stop importing them.

So how to solve the issue? Then read the how to guide below.

Import Blog RSS Feed To Facebook Like Page


You need third-party applications of course, thank God we have people to think about this issue when Facebook team seems not to able to solve the internal technical problems.

So here the 3 apps I recommend in the post, I have tried 2 of them and I have not tried the last one. But it’s created in the same purpose as the other which is to import blog Feed to Facebook Like Page.

1. RSS GraffitiRSS Graffiti is one of the perfect choices if you want your new published post appears on your Facebook profile or pages wall instantly each time you publish them. This way your entire fans will notice with what you just published and can “Like” or “Share” it to their friends.
You can visit RSS Graffiti page to install the app.
2. Dlvr.It Dlvr.it also has similar service as RSS Graffiti, can be used to deliver or to automatically import blog feed to Facebook seamlessly.
You can visit Dlvr.it page to install the app to your Facebook Like Page.
3. Blog RSS Feed ReaderBlog RSS Feed Reader. Never tried this app myself, but judging by the name and the developer’s description, Blog RSS Feed Reader brings similar service as RSS Graffiti and Dilvr.It. Therefore if you have tried many Blog Feed importing apps, and don’t like them, try this one then:).
You can visit Blog RSS Feed Reader page to install the app to your Facebook Like Page.
That would be all. Frankly there are more similar apps listed in Facebook app repository that offer similar services, but I selected only the ones I have used and one I consider good based on number of people who LIKE the app.

Note: All the apps above are NOT developed by Facebook. But they are third-party apps which are approved by Facebook to enrich this social networking environment. So there is a chance that one day, the apps developers decide not to continue their works.
Here is an example of RSS Grafitti performance on my Facebook Page Wall, don’t forget to like my page

Monday, October 6, 2014

How To Embed Facebook Status On Blog Posts

Now you can embed Facebook status / post that are publicly published by your friends or anyone listed as your Facebook's friends on blog post. The embed code can further be copied then pasted to any media like Blog or Website. So your readers can see the updates plus with all the comments and like flowing on the status.

Facebook is getting social with this feature to reach as many people as it can and to get the bigger exposure as possible.

So if you find any interesting status / posts in Facebook that you would like to share on your blog then simply use the Embed Post feature that can be found in right side of the user name. Like in this picture.
How To Embed Facebook Status On Blog Posts
Once you click the Embed Post then you will find a popup windows containing the embed code, in here you can set the size of the post. All it's explained clearly. Thus you will find it very easy.

The feature is not only limited to posts or status that containing texts, the embedded code will also bring you picture or videos as long as the users set their post "Public".

You can try yourself. And now and forward the Facebook posts can flow on our blog / website post.

How To Quickly Increase Facebook Like Number

The article will tell you how to quickly increase Facebook like number for your Blogspot Blog, you can follow what I share here and the result your FB Like number will be increasing quickly. Trust me on that!

By displaying a floating Facebook like box into your blog's readers / visitors screen, then you have done a big thing to increase your Facebook fan / like numbers. There is a big and hard to avoid chance your visitors would click the Facebook Like button.

As the title says you can achieve that by displaying a floating Facebook like box on your visitors screen, it will float following any scroll your visitors roam during their visits to your blog.

But this thing will of course irritate your readers, it's forcing them to click the like button by keep popping up wherever your visitors go. But of course you can set the time of its appearance, once it reaches the set time it will disappear by itself. Also there is a Close button too, so your visitor can click it to get rid off the box.

Personally I don't recommend using the floating Facebook like box on screen, but in regard of sharing information related to blogging I couldn't just leave this behind. Your visitor will likely run away from your blog once they see it.

And how about if your readers have clicked the Like button, will it keep appearing on their screens. The answer is no, once your visitor like your page it will stop showing up.

If you have made up your mind and want this feature, then let's get into the steps below to show a floating Facebook like box on Blogspot Blogger.

Now login to your Blogger.com, then head to template -> edit html. Then find the </body>. Now paste the following lines of codes right above it.

<!-- Likebox Pro FBFan Code Start -->
<style>
#fblikepop { background-color: #fff; display: none; position: fixed; top: 200px; _position: absolute; width: 450px; border: 10px solid #6F6F6F; z-index: 200; -moz-border-radius: 9px; -webkit-border-radius: 9px; margin: 0pt; padding: 0pt; color: #333333; text-align: left; font-family: arial,sans-serif; font-size: 13px;}
#fblikepop body {background: #fff none repeat scroll 0%; line-height: 1; margin: 0pt; height: 100%;}
.fbflush { cursor: pointer; font-size: 11px !important; color: #FFF !important; text-decoration: none !important; border: 0 !important;}
#fblikebg { display: none; position: fixed; _position: absolute; height: 100%; width: 100%; top: 0; left: 0; background: #000000; z-index: 100;}
#fblikepop #closeable { float: right; margin: 7px 15px 0 0;}
#fblikepop h1 { background: #6D84B4 none repeat scroll 0 0; border-top: 1px solid #3B5998; border-left: 1px solid #3B5998; border-right: 1px solid #3B5998; color: #FFFFFF !important; font-size: 14px !important; font-weight: normal !important; padding: 5px !important; margin: 0 !important; font-family: &quot;Lucida Sans Unicode&quot;, &quot;Lucida Grande&quot;, sans-serif !important;}
#fblikepop #actionHolder {height: 30px;overflow: hidden;}
#fblikepop #buttonArea {background: #F2F2F2;border-top: 1px solid #CCCCCC;padding: 10px;min-height: 50px;}
#fblikepop #buttonArea a {color: #999999 !important;text-decoration: none !important;border: 0 !important;font-size: 10px !important;}
#fblikepop #buttonArea a:hover {color: #333 !important;text-decoration: none !important;border: 0 !important;}
#fblikepop #popupMessage {font-size: 12px !important;font-weight: normal !important;line-height: 22px;padding: 8px;background: #fff !important;}
#fblikepop #counter-display {float: right;font-size: 11px !important;font-weight: normal !important;margin: 5px 0 0 0;text-align: right;line-height: 16px;}</style>
<script src='http://www.google.com/jsapi'/><script>google.load(&quot;jquery&quot;, &quot;1&quot;);</script>
<script src='http://connect.facebook.net/en_US/all.js#xfbml=1' type='text/javascript'/>
<script type='text/javascript'>
//<![CDATA[
kakinetworkdotcom01username="TILBIT",
kakinetworkdotcom01title="Don't forget to like us",
kakinetworkdotcom01skin="01",
kakinetworkdotcom01time="25",
kakinetworkdotcom01wait="0",
kakinetworkdotcom01lang="en"
//]]>
</script>
<script src='http://blognyailmu.googlecode.com/files/likeboxpopup.js' type='text/javascript'/>
<script type='text/javascript'>
//<![CDATA[
$(document).ready(function(){$().kakinetworkdotcom({ closeable: True });});
//]]>
</script>
<!-- Likebox Pro FBFan Code End -->

Notes;
  • Change TILBIT with your Facebook Like page ID.
  • Don't forget to like us can be changed to any line you like.
  • 25 is the time period of its appearing, you can change it to any number you want as long as not too long.
  • True means that the floating box will have this X / Close sign, that will be used for your visitors to delete the box.
  • 01 is the skin code model. You can choose among other models. Here are the models.

Gambar untuk kode 01
Skin 01


Tampilan Skin atau Gambar 02
Skin 02
Tampilan Skin atau Gambar 03
Skin 03

Tampilan Skin atau Gambar 04
Skin 04
Let's say you want to use Skin 04, just put the 04 to replace 01 skin.

That's it and wait for a few days or a week you will be noticing that your Facebook Like numbers are increasing amazingly.