Complete guide to increase or improve Alexa ranking quickly is actually very easy but there are a few Alexa ranking's characters that you must firstly understand.
So I will also explain the material as simple as possible, because it is pretty simple.
A basic nature of Alexa Ranking
First thing you must keep in your mind is Alexa rank is get nothing to do with SEO.
So if you think the higher (I mean the smaller number) of your Alexa ranking means it will benefit your blog's performance in Google SERP, then erase that thought immediately.
It is because Alexa ranking is calculated if you use Alexa products like Alexa toolbar, Alexa Widget and Alexa rank meta tag verification.
So if people who visit your web / blog has Alexa toolbar installed on their browser, then Alexa will count its visits. Or if your blog has Alexa widget then every visit your blog gets will be counted.
The same thing also happens when you place Alexa meta tag in your Blogger's head area.
So if there are no three of the mentioned then Alexa will likely slow to count your blog's ranking.
After you read the above explanation now you might be confused by one question like if Alexa ranking doesn't benefit our blog in search engines, why in the world I should bother with Alexa ranking.
Actually, you don't need to think much of it. Most people doesn't take Alexa ranking seriously. It doesn't reflect anything -- except make your blog looks important if it has a good Alexa ranking.
Or if you sell links or participating in paid review business, you will need a good Alexa ranking for getting a high price.
I think all the explanations above is sufficient to shed some lights regarding Alexa ranking. Now it's time to give you a complete trips to improve or increase Alexa ranking for your blog. Just follow all the methods to get a maximum and a quick result.
What we need to quickly improve our Alexa ranking is by installing all the said Alexa products which are; Alexa widget, Alexa extension and Alexa meta description.
By install all of them we will get a quick result. And I will separate the tutorials into three section, the first one is how to install the Alexa widget, the second section is to install Alexa extension, the last section is to install Alexa verification rank meta code. Without furher ado, let's do it.
Complete guide to quickly improve or increase Alexa ranking
- Open Alexa.Com, or you can simply visit Alexa support page.
- And now hit the Can I display my Alexa rank on my site?
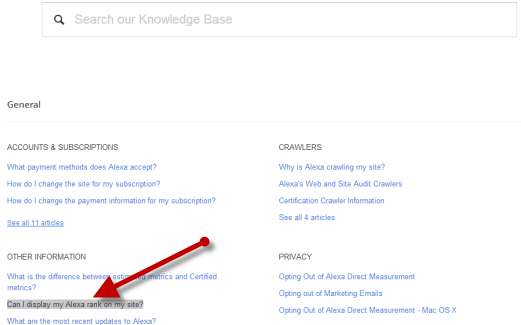
- Or just visit this Alexa page to get to the widget faster. Now you will be presented with the actual code of the Alexa Widget, there are number of codes, each code refers to the size or the form of the widget. Pick one you like and don't forget to change this; yoursite.com with your own blog's url.

- Now copy the code and then paste the code to your Blogspot Blogger HTML/Javascript widget (Go to Dashboard -> Layout -> Add a gadget -> HTML/Javascript.
- Open this url http://www.alexa.com/toolbar using your preferred browser, as to me I use Chrome.
- Click on the Install Alexa Extension green button.
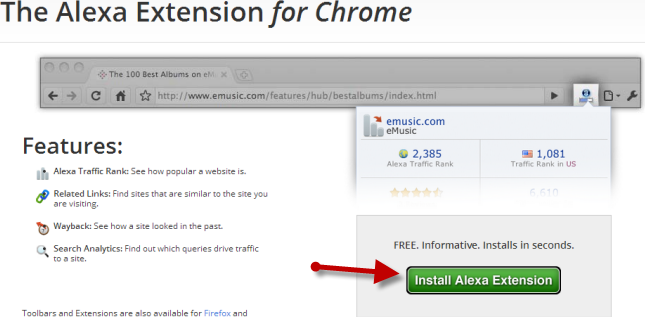
- Click on Accept and Install.
- Just allow if it ask about permission, etc.
- And then follow the on-screen instructions until you are asked to restart your browser. Therefore restart your browser, and then launch it you will then see the Alexa toolbar installed on your browser. So from now and forward all your visits will be counted by Alexa to improve your Alexa ranking.
Section 3. Install Alexa verification code.
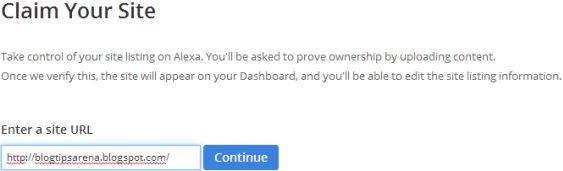
- You need to login to your Alexa.com or sign up for an account.
- Once you have registered, now open this url; http://www.alexa.com/siteowners/claim.
- And enter your blog's url on the provided form and hit Continue.
- Now select one method from the available verification methods. I suggest you to select Method 2.

- You will be given a meta verifyid tag code that you need to copy and paste on your Blogger's head.

- Drag the code and copy it.
- Now login to your Blogger dashboard -> Template -> Edit HTML -> paste the code after <head> or before the closing head </head>. See the image below as example.

- Save your template.
- Now it's time to hit the verify blue button to make sure whether Alexa can verify your claim or not. So now go back to the Alexa method 2 you selected previously and hit the Verify My ID blue button. If you are right you will get the notification below the button just like this.
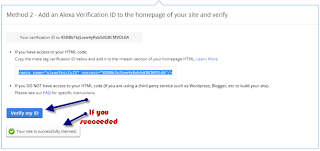
- If you get the notification. Congratulation.
Well you have learned and followed all the complete guide to improve or increase Alexa ranking quickly, now all you need to do is wait for Alexa to update your ranking.
If you combine the 3 quick ways with optimizing your blog to be Google friendly, the result will be a lot faster.
Keep in mind, having a high traffic is of course the first and essential factor to reduce your Alexa number that means improving your ranking.


