Wednesday, October 15, 2014

Facebook RSS Feed Apps To Import Blog RSS Feed To Facebook Like Page

Importing blog RSS feed to Facebook will give benefit to our blog, especially if you have already have many friends, your new published post will be exposed to your entire friends. They will be notified, if they are interested, there is a big chance they will visit your post. That’s the traffic comes from.
Blog RSS Feed To Facebook


That’s only importing RSS feed blog on your personal Facebook account, how about importing to your Facebook Like (previously Fan) page? Yes it is the same way as importing to personal profile, via Notes -> My Notes -> Edit Import Notes and place the Feed URL there.

Like the following two pictures as the illustrations.

Importing RSS Feed To Facebook Like
And.
Import Blog RSS Feed To Facebook

But it does not work well if the same method is applied on Facebook Like Page. The above works only on our Facebook profile account.

When you apply the same on Facebook Like Page, then you hit Start Importing button, yes your last posts appear on your Facebook Like Page but ONLY THAT DAY, in the next days when you publish new posts. Facebook stop importing them.

So how to solve the issue? Then read the how to guide below.

Import Blog RSS Feed To Facebook Like Page


You need third-party applications of course, thank God we have people to think about this issue when Facebook team seems not to able to solve the internal technical problems.

So here the 3 apps I recommend in the post, I have tried 2 of them and I have not tried the last one. But it’s created in the same purpose as the other which is to import blog Feed to Facebook Like Page.

1. RSS GraffitiRSS Graffiti is one of the perfect choices if you want your new published post appears on your Facebook profile or pages wall instantly each time you publish them. This way your entire fans will notice with what you just published and can “Like” or “Share” it to their friends.
You can visit RSS Graffiti page to install the app.
2. Dlvr.It Dlvr.it also has similar service as RSS Graffiti, can be used to deliver or to automatically import blog feed to Facebook seamlessly.
You can visit Dlvr.it page to install the app to your Facebook Like Page.
3. Blog RSS Feed ReaderBlog RSS Feed Reader. Never tried this app myself, but judging by the name and the developer’s description, Blog RSS Feed Reader brings similar service as RSS Graffiti and Dilvr.It. Therefore if you have tried many Blog Feed importing apps, and don’t like them, try this one then:).
You can visit Blog RSS Feed Reader page to install the app to your Facebook Like Page.
That would be all. Frankly there are more similar apps listed in Facebook app repository that offer similar services, but I selected only the ones I have used and one I consider good based on number of people who LIKE the app.

Note: All the apps above are NOT developed by Facebook. But they are third-party apps which are approved by Facebook to enrich this social networking environment. So there is a chance that one day, the apps developers decide not to continue their works.
Here is an example of RSS Grafitti performance on my Facebook Page Wall, don’t forget to like my page

Change Blogspot Pages Navigation Into Numbers Navigation

In general, pages navigation in Blogspot presented with the text links wrapped with the words Older Posts and Newer Posts. Differs from Wordpress that can be changed into numbers so we can jump to the certain pages to find the older articles.

If you wish to change the blogger Older / Newer Posts navigation into Number, it's your lucky day because in this post you will be guided to do so. The point of having this numeric navigation installed is of course to make easier to navigate to your old posts.

As the result you will see the following numbers navigation like in the following picture.
Change Blogspot Pages Navigation Into Numbers Navigation

Steps to change Older / Newer Posts navigation into Number


Step 1. Firstly your need to go to Edit HTML of your Blogspot (Template -> Edit HTML)

Step 2. After you are in the Edit HTML, just find this code ]]></b:skin> once you found it then place this script right above that code.
.showpageArea a {
text-decoration:underline;
}
.showpageNum a {
text-decoration:none;
border: 1px solid #cccccc;
margin:0 3px;
padding:3px;
}
.showpageNum a:hover {
border: 1px solid #cccccc;
background-color:#cccccc;
}
.showpagePoint {
color:#333;
text-decoration:none;
border: 1px solid #cccccc;
background: #cccccc;
margin:0 3px;
padding:3px;
}
.showpageOf {
text-decoration:none;
padding:3px;
margin: 0 3px 0 0;
}
.showpage a {
text-decoration:none;
border: 1px solid #cccccc;
padding:3px;
}
.showpage a:hover {
text-decoration:none;
}
.showpageNum a:link,.showpage a:link {
text-decoration:none;
color:#333333;
}
Note. The code you just placed above ]]></b:skin> is the CSS code to form the page numbers navigation so it will look just like in the above picture example.
Step 3. Now you need to find this tag </body> then place the following lines of codes right before it.
<!--Page Navigation Starts-->
<b:if cond='data:blog.pageType != &quot;item&quot;'>
<b:if cond='data:blog.pageType != &quot;static_page&quot;'>
<script type='text/javascript'>
var pageCount=5;
var displayPageNum=5;
var upPageWord =&#39;Previous&#39;;
var downPageWord =&#39;Next&#39;;
</script>
<script src='http://bloggergadgets.googlecode.com/files/blogger_pagenavi_min.js' type='text/javascript'/>
</b:if> </b:if>
<!--Page Navigation Ends -->
Save your template, now open your Blogspot homepage to see the result.

Rightest Way To Find Most Searched Keywords In Google

Keyword Research
Choosing right keywords is very important. Because if you choose wrong keywords then don't blame anyone if your blog seems like a cemetery. That means you will get very less blog traffic.

So to avoid that, in this post I would like to share a little tips on how to make keyword research or targeting the right keywords that hopefully could help you find the keywords to be targeted.

Actually in internet there are many methods to find most searched keywords. The most popular one is using Google Adwords; Keyword Planner.

But if I can be honest the Google Adwords; Keyword Planner is not really an aptly solution to search keyword. Why? Because of the following two reasons;

  • Keywords from Google Adwords are limited.
  • Already used by many people / bloggers.
In this post I won't use Keyword Planner to find the most searched keywords, instead I use the feature just to see the searches amounts of each keywords and the competitions.

Are you curious? Then continue reading this post.

How to make a keyword research or find the most searched keywords in Google


Following you will find the rightest way to perform keyword research to find the most searched keywords in Google, you will end up getting huge traffic flowing to your blog like rains.

But of course high traffics don't come easily, there is a tight competitions you must win for the keywords that popularly and most searched by people.

We will be using a handy tool namely Ubersuggest. This tool will present keywords related to topic we search but with more various results compared with Google Adwords: Keyword Planner.

Once we got the keywords from the tool, we will then use Google Adwords: Keyword Planner to check how many searches people did on that keywords and how tight the competition is.

Steps to use Ubersuggest.org.

1. Open this url; ke http://ubersuggest.org.

2. You will find an interface where you are required to fill a keyword and select the country and type of content. Like this.


3. For example, if you want to target the Android, then fill the blank form with Android.
4. And if you want to target visitors from US, then set it English US. So the tool will give all the keywords from the country using English.
5. Enter the CAPTCHA and then hit the Suggest button.
6. Now you will be presented with list of keywords suggestions based on main keyword you typed which is Android.
7. Now hit the Select All Keywords.
8. Now click on Get.


9. Now copy all the keywords, then paste them all to notepad or any other similar app, save it using file.txt name.


10. Now login to Google Adwords: Keyword Planner

  • Click "Get traffic estimates for a list of keywords"
  • Upload the keyword file you previously saved, the file.txt.
  • Now click Get estimates

11. Click "Download".
Cari Keyword
Tips before you hit the download, you can change the "Match types" "Exact Match" to get the more accurate data.

12. Select the .CSV format file then click Download

Download Keyword


13. Open the CSV file, now you can select which keywords get the most search amounts and the competitions from the list.
Kata Kunci Mantab

Easy, wasn't it? Of course.

Monday, October 6, 2014

How To Embed Facebook Status On Blog Posts

Now you can embed Facebook status / post that are publicly published by your friends or anyone listed as your Facebook's friends on blog post. The embed code can further be copied then pasted to any media like Blog or Website. So your readers can see the updates plus with all the comments and like flowing on the status.

Facebook is getting social with this feature to reach as many people as it can and to get the bigger exposure as possible.

So if you find any interesting status / posts in Facebook that you would like to share on your blog then simply use the Embed Post feature that can be found in right side of the user name. Like in this picture.
How To Embed Facebook Status On Blog Posts
Once you click the Embed Post then you will find a popup windows containing the embed code, in here you can set the size of the post. All it's explained clearly. Thus you will find it very easy.

The feature is not only limited to posts or status that containing texts, the embedded code will also bring you picture or videos as long as the users set their post "Public".

You can try yourself. And now and forward the Facebook posts can flow on our blog / website post.

Complete Ways To Clean Blogspot From Duplicate Content

Google hates duplication, thus as a blogger we better avoid the duplicate content that will effect nothing but negative to our blog's performance.

If your blog is detected to have duplicate contents then it will perform poorly in Google. As the result we don't get the amount traffic we are expecting. Nobody wants that.

Luckily in the modern blogger.com we are spoiled with many features to keep our blog clean from duplicate content.

If you have been blogging in Blogger.com for the last one year. Then you should already know that we can instruct Google not to index the certain area of our blog.

The area we should exclude from Google indexing is of course the archive. Archive contains the lists of articles we published for certain periods like months for example.

If you have a published article and it's indexed by Google its archive will be indexed too. The archive will show the same description as the article. Here is the example.

As you see the post A gives the similar description as the Archive A. Both of them will be detected as the duplicate description by Google, beside it's not good for our blog's performance in Google result page, it will also confuse our visitors.

Complete Ways To Clean Blogspot From Duplicate Content

So to deal with the said situation, you can do a little thing and you will be guided by this post to do so.
  1. Login to your Blogger.com account.
  2. Now to the Settings -> Search Preferences -> Custom robots header tags then set it to Yes.
  3. And then do exactly like shown in the below screenshot.
Complete Ways To Clean Blogspot From Duplicate Content
By setting Noindex to Archive and Search pages you have asked Google not to index all the archive of your blog. This way will save your blog from being detected containing the duplicate content.

And if you want to totally clean your blog from other duplication you can also add the following commands in your robots.txt file.
Disallow: /search
Disallow: /?m=1
Disallow: /?m=0
Disallow: /*?m=1
Disallow: /*?m=0
By adding the above commands on your robots.txt file, all your URL blog's mobile pages will not being indexed to stop generating duplicate contents.

After performing the methods here your blog will be free from duplication and you can expect to get the best performance possible in Google result page.

Any question? Don't be shy to reveal them here.

Fastest Way To Be Indexed By Google For New Blog And Posts

This is the fastest way to be indexed by Google for your new blog or new posts. You should use the method recommended here. If you wish the fastest indexing process.

There was a time that we wished Google had indexed our blog / posts faster, so we would gain benefits from it. It was past, when the time can not control the indexing speed.

But until Google released the "Fetch as Google" feature in Google Web Master Tools about 3 4 years ago. With it now we can instantly submit our new blog / posts to be immediately indexed and appear on Google Search Result page.

If you have been facing troubles regarding indexing over your new posts, the most recommended solution for you is Fetch as Google. With it your new blog or post will be instantly indexed, it takes only a minute or two, sometimes the indexing process is only less than a minute.

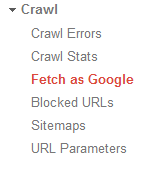
The process is pretty simply, you need to register / add your blog to Google Web Master Tools. Once it's fully added you can further click on the Fetch as Google feature under the Crawl menu on the right sidebar on your screen.
Fastest Way To Be Indexed By Google

If you want to submit your new blog then simply click the Fecth button. Or if it's your post / page that you wish to be indexed, simply paste the permalink. Like this.

Here is the example, as for me I want to submit this post URL, I simply paste this URL; "2014/01/fastest-way-to-be-indexed-by-google.html" to the provided form then hit the Fetch button.

Indexed By Google Fastest Way

Finish my friend. The process is amazingly simply but the effect is magnificent. You don't need a day or two to be indexed, you don't even need a backlink points to your blog or its post. Simply fetch it as if you are Google. You should use it daily.

Now all you need just wait a minute or two at maximum. Check it whether Google has indexed your blog or its posts via Google com.

You need to remember that this method only make your newly blog or its post indexed faster, but not helping its ranking in Google search result page.

Done! That's the fastest way to be indexed by Google that I highly recommended for you. If you have any question then don't be shy to reveal it.

How To Create Site Map On Blogspot Blog

How to create Site Map on Blogger, may be you have not realized that Google really likes a blog or website with neat design and all the contents compiled smartly, to ease visitors when browsing each part or contents of the site.

There are many ways to ease our visitors or readers when interacting with our blogs, like installing Breadcrumbs or putting related post with thumbnails for blogspot.  And creating Site Map is one of the ways recommended by me.

A Site Map page is a place contains a list of all contents of our blogs, like postings classified based on categories. A category that the post is listed. Like a book, we usually find one page (or two) containing table of contents to navigate the readers.

That is what Site Map is for like a table of contents in a book, you can create it on your Blogspot blog easilly. And the result can be seen in this Site Map page.

If you want to create the same on your blog to make your Blogspot blog looks smarter and more reader friendly, then follow the steps below.

How to create Site Map page on Blogspot Blogger

Step 1. Login to your Blogger.com

Step 2. Now open a new page, remember not a post but a page. See the following picture.
Laman
Step 3. Now put the following code to the page and select Edit HTML.
Remember to create a page for the Site Map not a post, then place the code on the Edit HTML just like on the right side picture.
<script src="http://myjsdot.googlecode.com/files/sitemap.js">
</script>
<script src="http://yourname.blogspot.com/feeds/posts/default?max-results=9999&amp;alt=json-in-script&amp;callback=loadtoc">
</script>
Change yourname.blogspot.com with your own URL name this can be applied on custom domain too. After that click the Publish button to publish your newly Site Map page.
Done, because you just followed the easiest instructions to create a Site Map page on Blogspot Blog.