How to install Facebook open graph (OG) on each Blogspot post, it's quite easy and the function of its to maximize your post or content when it's shared on Facebook. So when you share your post or anyone share your post, and it only shows the title and descriptions of the post without thumbnail, then I suggest you to use the Facebook open graph tag here.
If you have installed it correctly, it's nearly 100% your shared post will appear just like in the following image.
If your post appears like in the image, of course will attract any Facebook users to visit that will generate you extra traffic from Facebook. Because it's so eye catching.
And the following is the Facebook open graph you need to place inside the <head> or place anywhere before the <b:skin><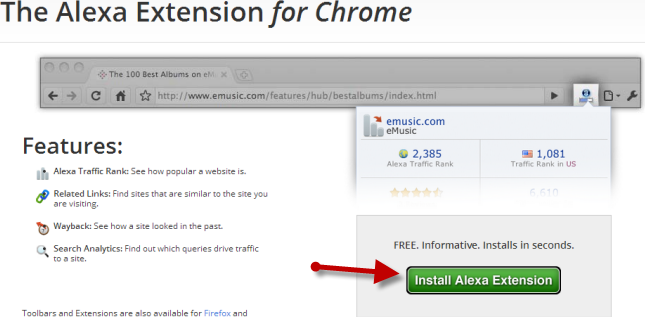
- Now hit on Accept and Install.
- Grant the permission for toolbar to be installed on your browser.
- Follow the rest of the steps till you are asked to restart your browser. Thus restart it, and once your browser is opened you will see the Alexa toolbar. Now your visit counts by Alexa.
That's all to do to install Alexa toolbar on your browser.
Friday, November 21, 2014
How To Install Alexa ranking Widget On Blog
In this post you will be told on how to install Alexa ranking Widget on blog as one of the products Alexa uses to calculate the ranking of your blog.
Since it's a determinants factor -- I mean it's a factor that decisively affects the outcome of Alexa ranking calculation -- thus it can be used to improve your blog's ranking in Alexa, to know more about Alexa you can visit my previous post in how to improve Alexa ranking.
If you have installed Alexa widget on your blog, it will then monitor your blog and decide the quality and popularity your blog has.
In Alexa the smaller the number of your ranking is the better. Thus if your ranking is below 100.000 then it's good.
But keep in mind, Alexa ranking doesn't give any benefits for your SEO campaign, Google doesn't use it as a factor to rank your blog.
And installing this widget could effect your blog's loading speed since it's using Javascript that will make your blog load slower.
Anyway I have revealed all the consequences of installing Alexa widget, if you have made up your mind to install it. Then follow all the steps.
How Install Alexa Widget on Blogger.
- You can visit Alexa.com homepage, or just directly to Alexa support page.
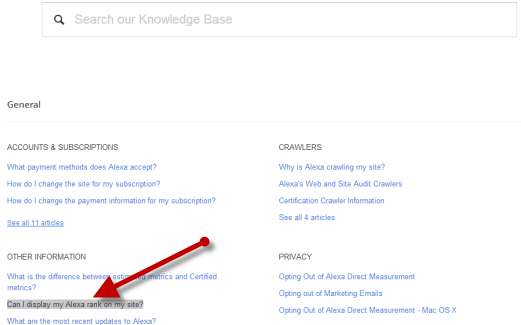
- Once you are on the page, click the text link that says Can I display my Alexa rank on my site?
- Or the faster way simply visit this Alexa page. And you will see two Alexa widget forms with the lines of codes beneath them. Pick the form you like and then drag it and copy it. One more thing, change this; yoursite.com with your URL. See the image.
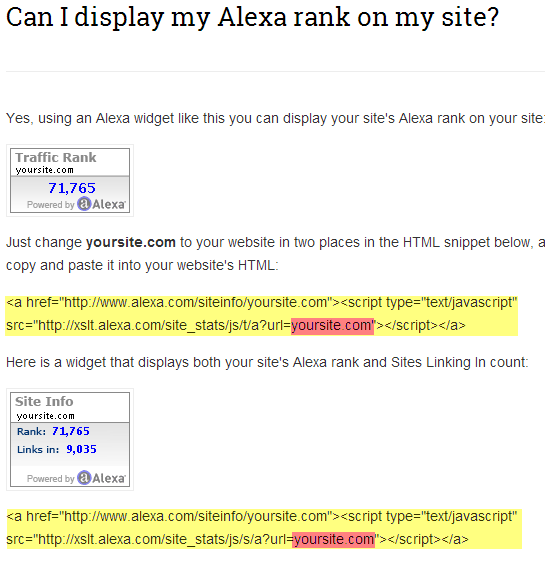
- Now paste the code to HTML/ Javascript gadget and save. (Dashboard -> Layout -> Add a gadget -> HTML/Javascript).
- Done.
Complete Guide To Increase Alexa Ranking Quickly
Complete guide to increase or improve Alexa ranking quickly is actually very easy but there are a few Alexa ranking's characters that you must firstly understand.
So I will also explain the material as simple as possible, because it is pretty simple.
A basic nature of Alexa Ranking
First thing you must keep in your mind is Alexa rank is get nothing to do with SEO.
So if you think the higher (I mean the smaller number) of your Alexa ranking means it will benefit your blog's performance in Google SERP, then erase that thought immediately.
It is because Alexa ranking is calculated if you use Alexa products like Alexa toolbar, Alexa Widget and Alexa rank meta tag verification.
So if people who visit your web / blog has Alexa toolbar installed on their browser, then Alexa will count its visits. Or if your blog has Alexa widget then every visit your blog gets will be counted.
The same thing also happens when you place Alexa meta tag in your Blogger's head area.
So if there are no three of the mentioned then Alexa will likely slow to count your blog's ranking.
After you read the above explanation now you might be confused by one question like if Alexa ranking doesn't benefit our blog in search engines, why in the world I should bother with Alexa ranking.
Actually, you don't need to think much of it. Most people doesn't take Alexa ranking seriously. It doesn't reflect anything -- except make your blog looks important if it has a good Alexa ranking.
Or if you sell links or participating in paid review business, you will need a good Alexa ranking for getting a high price.
I think all the explanations above is sufficient to shed some lights regarding Alexa ranking. Now it's time to give you a complete trips to improve or increase Alexa ranking for your blog. Just follow all the methods to get a maximum and a quick result.
What we need to quickly improve our Alexa ranking is by installing all the said Alexa products which are; Alexa widget, Alexa extension and Alexa meta description.
By install all of them we will get a quick result. And I will separate the tutorials into three section, the first one is how to install the Alexa widget, the second section is to install Alexa extension, the last section is to install Alexa verification rank meta code. Without furher ado, let's do it.
If you combine the 3 quick ways with optimizing your blog to be Google friendly, the result will be a lot faster.
Keep in mind, having a high traffic is of course the first and essential factor to reduce your Alexa number that means improving your ranking.
So I will also explain the material as simple as possible, because it is pretty simple.
A basic nature of Alexa Ranking
First thing you must keep in your mind is Alexa rank is get nothing to do with SEO.
So if you think the higher (I mean the smaller number) of your Alexa ranking means it will benefit your blog's performance in Google SERP, then erase that thought immediately.
It is because Alexa ranking is calculated if you use Alexa products like Alexa toolbar, Alexa Widget and Alexa rank meta tag verification.
So if people who visit your web / blog has Alexa toolbar installed on their browser, then Alexa will count its visits. Or if your blog has Alexa widget then every visit your blog gets will be counted.
The same thing also happens when you place Alexa meta tag in your Blogger's head area.
So if there are no three of the mentioned then Alexa will likely slow to count your blog's ranking.
After you read the above explanation now you might be confused by one question like if Alexa ranking doesn't benefit our blog in search engines, why in the world I should bother with Alexa ranking.
Actually, you don't need to think much of it. Most people doesn't take Alexa ranking seriously. It doesn't reflect anything -- except make your blog looks important if it has a good Alexa ranking.
Or if you sell links or participating in paid review business, you will need a good Alexa ranking for getting a high price.
I think all the explanations above is sufficient to shed some lights regarding Alexa ranking. Now it's time to give you a complete trips to improve or increase Alexa ranking for your blog. Just follow all the methods to get a maximum and a quick result.
What we need to quickly improve our Alexa ranking is by installing all the said Alexa products which are; Alexa widget, Alexa extension and Alexa meta description.
By install all of them we will get a quick result. And I will separate the tutorials into three section, the first one is how to install the Alexa widget, the second section is to install Alexa extension, the last section is to install Alexa verification rank meta code. Without furher ado, let's do it.
Complete guide to quickly improve or increase Alexa ranking
Section 1. Install Alexa Widget.
- Open Alexa.Com, or you can simply visit Alexa support page.
- And now hit the Can I display my Alexa rank on my site?

- Or just visit this Alexa page to get to the widget faster. Now you will be presented with the actual code of the Alexa Widget, there are number of codes, each code refers to the size or the form of the widget. Pick one you like and don't forget to change this; yoursite.com with your own blog's url.

- Now copy the code and then paste the code to your Blogspot Blogger HTML/Javascript widget (Go to Dashboard -> Layout -> Add a gadget -> HTML/Javascript.
Section 2. Install Alexa toolbar / extension on browser.
- Open this url http://www.alexa.com/toolbar using your preferred browser, as to me I use Chrome.
- Click on the Install Alexa Extension green button.

- Click on Accept and Install.
- Just allow if it ask about permission, etc.
- And then follow the on-screen instructions until you are asked to restart your browser. Therefore restart your browser, and then launch it you will then see the Alexa toolbar installed on your browser. So from now and forward all your visits will be counted by Alexa to improve your Alexa ranking.
Section 3. Install Alexa verification code.
- You need to login to your Alexa.com or sign up for an account.
- Once you have registered, now open this url; http://www.alexa.com/siteowners/claim.
- And enter your blog's url on the provided form and hit Continue.

- Now select one method from the available verification methods. I suggest you to select Method 2.
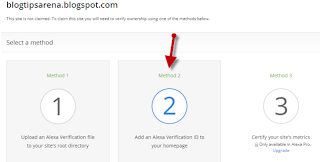
- You will be given a meta verifyid tag code that you need to copy and paste on your Blogger's head.
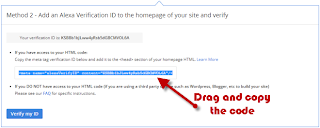
- Drag the code and copy it.
- Now login to your Blogger dashboard -> Template -> Edit HTML -> paste the code after <head> or before the closing head </head>. See the image below as example.
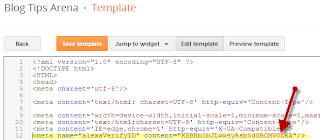
- Save your template.
- Now it's time to hit the verify blue button to make sure whether Alexa can verify your claim or not. So now go back to the Alexa method 2 you selected previously and hit the Verify My ID blue button. If you are right you will get the notification below the button just like this.
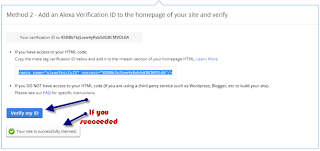
- If you get the notification. Congratulation.
If you combine the 3 quick ways with optimizing your blog to be Google friendly, the result will be a lot faster.
Keep in mind, having a high traffic is of course the first and essential factor to reduce your Alexa number that means improving your ranking.
Thursday, November 20, 2014
Automatically Install Meta Description On Blogspot
Automatically install meta description on Blogspot is probably the thing you need and the step is also easy. Since it's too easy therefore this article won't be lengthy. Actually if you want to be right, then setting a meta description manually is more recommended rather than automatically. Because you have a chance to put the keyphrases you believe will be typed by people on search engine box. But of course it's your choice.
Again, manually write meta description for an article you are about to publish is a lot better and if you choose that you made a right decision.
But if you prefer to set the meta descriptions automatically, then this article will guide you to accomplice it. Before we begin, make sure you have enable meta description on your Blogger by going to Settings -> Search Preferences and then write your home page blog meta descriptions on the top part and then save it.
How to automatically set Blogspot meta description
- Open the template of your Blogger.
- Now click Edit HTML.
- Find this tag </title> then place the following lines of codes after the tag.
<meta expr:content='data:blog.pageName + " dari blog " + data:blog.title + " dengan judul " + data:blog.pageName' name='description'/>
- Then hit the Save Template.
- Done! Now you have set your meta tag description automatically and of course it's more SEO friendly.
Friday, October 17, 2014
Places To Find The Most Popular Keywords In The Internet
Places to find the most popular keywords on the internet. Getting a high targeted traffic is probably the most wish of every Blogger that puts a lot of attentions to earn an extra revenue from blogging.
Of course when talking about traffic, automatically we talk about Search Engines, the places where people type for certain keyphrases/keywords to find information they need.
And it’s very advisable if a blogger is aware on the most or popular search keywords that people search every day on popular search engines. The following I listed of web’s query stream to find the most searched keyword.
The sites can be good places for any Bloggers to discover the most popular keywords people search in those giant search engines, and put good efforts to optimize the keywords to generate a high targeted traffic to your blog.
You can also follow the guides I wrote here to find the most searched keywords on Google.
Of course when talking about traffic, automatically we talk about Search Engines, the places where people type for certain keyphrases/keywords to find information they need.
And it’s very advisable if a blogger is aware on the most or popular search keywords that people search every day on popular search engines. The following I listed of web’s query stream to find the most searched keyword.
- AOL Hot Searches (http://search.aol.com/aol/trends).
- Google Trends (http://google.com/trends)
- Bing Keyword Research (http://www.bing.com/toolbox/keywords)
- Yahoo Tending Now (https://www.yahoo.com/)
The sites can be good places for any Bloggers to discover the most popular keywords people search in those giant search engines, and put good efforts to optimize the keywords to generate a high targeted traffic to your blog.
You can also follow the guides I wrote here to find the most searched keywords on Google.
2 Simple Answers To Increase Traffic To A Blog
I am frequently asked by my friends in BBM or Whatsapp about how to generate and increase high traffic to a blog, this is a general question for any bloggers.
To tell you the truth you have known the answer, but it’s probably you have not practiced it quite serious.
Getting traffic to blog is of course tightly related to make our visitors happy. When you have number of happy visitors, your eyes will see the rate of your blog's bounce will decrease (the smaller the bounce the better).
Less bounce rate means your readers spend more time in your blog, the time they take while staying on our blog depends how many words they read. The more words they read will keep them longer on your blog, if that happens your bounce rate will decrease.
And Google monitors our visitors activities, and will decide your blog's relevancy with keywords your visitors's search on Google. If your visitors stay long, Google will think your content is indeed relevant with the keywords.
So in the future, if someone else search for the same keywords, your blog will be on the first list to be shown on Google SERP.
And how to achieve that and how to make our visitors happy? That's of course related on two (in my humble opinion) which are how we maintain our blog and our style of writing. Yes I believe our writing style can be a factor on helping our position on Google search engine result.
Perhaps you are asking the question, the meaning our style of writing is simply to write as clear as possible to make our reader easily understand with the point we are trying to deliver.
To create that kind of joyful condition, you should overcome the material you are bringing on your post.
That will of course ease your job to write and accommodate your readers to catch the points.
People use to say to write a quality content, I agree with that, quality content means to motivate us to really write a content seriously, not just blazing words then publish just to keep update.
You are a blogger, you should help your readers find solutions, your articles should be their helper and solutions.
Try to read your published posts, then ask a question to yourself afterward; will I be helped with this article? Your answer should be honest, place yourself in your readers's shoes. If your answer No, this won't help, or less helping, then find the areas on your post that need to be improved.
This section is of course related to keep keep updating your blog regularly and doing an ethical promotion. Google does like a blog that's live, not a dead blog, with rarely maintained.
Well if you are expecting visitors with only two or three posts only, then you are expecting a sun will rise in west.
If you don’t take your blog life seriously, you won’t get amount of traffic you wish, trust me on that. Just do everything consistently now. You’ll be surprised for future outcome.:D
So as a summary...
Update your blog continually with your with fresh contents, an educative, an informative and an entertaining content are the most wanted by readers, they will look forward hungrily for the next update if they found your blog meet their like and of course Google love it too.
That means update your blog with your writing style, the style that with one purpose only which is make your readers easily understand the points with complete, clear and correct information.
Don't forget to also see the most searched keywords in Google post, there you will find the topics people frequently search in Google reported monthly.
You will be told how many searches people do for certain keywords monthly and the competitions. From that report you can start posting articles related to the most searched keywords.
Promote your blog, you can do it aggressively or gradually depends on your method. But I suggest do it cleverly by following an ethical techniques to protect your site being banned by search engines.
You can use the available promoting services like Twitter, Facebook, Google Plus, etc. Also you can submit to the big social bookmarking sites.
Of course there is a plenty of roads on this issue. Take the ones that widely trusted to generate traffic for you.
That’s the whole point, the rest relies on you! That's 2 simple answer to increase traffic to your blog. And see you in the next post.
To tell you the truth you have known the answer, but it’s probably you have not practiced it quite serious.
Getting traffic to blog is of course tightly related to make our visitors happy. When you have number of happy visitors, your eyes will see the rate of your blog's bounce will decrease (the smaller the bounce the better).
Less bounce rate means your readers spend more time in your blog, the time they take while staying on our blog depends how many words they read. The more words they read will keep them longer on your blog, if that happens your bounce rate will decrease.
And Google monitors our visitors activities, and will decide your blog's relevancy with keywords your visitors's search on Google. If your visitors stay long, Google will think your content is indeed relevant with the keywords.
So in the future, if someone else search for the same keywords, your blog will be on the first list to be shown on Google SERP.
And how to achieve that and how to make our visitors happy? That's of course related on two (in my humble opinion) which are how we maintain our blog and our style of writing. Yes I believe our writing style can be a factor on helping our position on Google search engine result.
So what's the writing style I am talking about?
Perhaps you are asking the question, the meaning our style of writing is simply to write as clear as possible to make our reader easily understand with the point we are trying to deliver.
To create that kind of joyful condition, you should overcome the material you are bringing on your post.
That will of course ease your job to write and accommodate your readers to catch the points.
People use to say to write a quality content, I agree with that, quality content means to motivate us to really write a content seriously, not just blazing words then publish just to keep update.
You are a blogger, you should help your readers find solutions, your articles should be their helper and solutions.
Try to read your published posts, then ask a question to yourself afterward; will I be helped with this article? Your answer should be honest, place yourself in your readers's shoes. If your answer No, this won't help, or less helping, then find the areas on your post that need to be improved.
A tip from me; try to find other blog that shares the same topic; read the entire post. And compare the post with your post. See which one is help more, and which one is less helping. Try to see what makes other's blog post is better than yours.
How we maintain our blog.
This section is of course related to keep keep updating your blog regularly and doing an ethical promotion. Google does like a blog that's live, not a dead blog, with rarely maintained.
Well if you are expecting visitors with only two or three posts only, then you are expecting a sun will rise in west.
If you don’t take your blog life seriously, you won’t get amount of traffic you wish, trust me on that. Just do everything consistently now. You’ll be surprised for future outcome.:D
So as a summary...
Update your blog continually with your with fresh contents, an educative, an informative and an entertaining content are the most wanted by readers, they will look forward hungrily for the next update if they found your blog meet their like and of course Google love it too.
That means update your blog with your writing style, the style that with one purpose only which is make your readers easily understand the points with complete, clear and correct information.
Don't forget to also see the most searched keywords in Google post, there you will find the topics people frequently search in Google reported monthly.
You will be told how many searches people do for certain keywords monthly and the competitions. From that report you can start posting articles related to the most searched keywords.
Promote your blog, you can do it aggressively or gradually depends on your method. But I suggest do it cleverly by following an ethical techniques to protect your site being banned by search engines.
You can use the available promoting services like Twitter, Facebook, Google Plus, etc. Also you can submit to the big social bookmarking sites.
Of course there is a plenty of roads on this issue. Take the ones that widely trusted to generate traffic for you.
That’s the whole point, the rest relies on you! That's 2 simple answer to increase traffic to your blog. And see you in the next post.
Subscribe to:
Posts (Atom)


